Update: Pattern is now for sale in CozyBlue's Etsy Shop!
When Liz from CozyBlue asked me if I would like a free review copy of an embroidery pattern she was developing based on her custom screenprints I jumped at the chance. I had seen her screenprinted family trees before and I really love them. They are the perfect modern family tree. The design is fresh and striking, I love the clean lines, and that little heart at the center of the tree rings is adorable. These family trees would make wonderful presents for Mother's Day, or for the nursery of a new baby. I made mine for a good friend, as a housewarming present for her new home.
Liz did a really good job with her instructions for transferring the pattern to both light and dark material, and the pattern includes different shapes and sizes of extra leaves, so you can customize your tree however you like. The design is almost fool proof, all the lines are slightly irregular, so even if you make a minor mistake with your stitching, nobody will ever know the difference. Depending on how much extra embellishing you want to add to your family tree, I think this is a weekend project for most crafty people, from transferring the design to framing.
I really loved the indigo and greenish yellow that Liz used in her print so I kept the colours the same in my project. I have been really inspired by the work of Melissa Crowe and that is where I got the idea to add some felt applique for both added texture and solid colour. If you would like to do the same, I traced the original pattern onto the matte side of some freezer paper, lightly ironed the paper shiny side down onto my felt and then I was able to cut out the pieces easily and accurately. After removing the freezer paper, you can flip the felt pieces upside down and lightly spray them with spray adhesive so that they stay in place while you stitch them down. I used tiny running stitches with a single strand of embroidery thread to hold the felt in place.
Some of my favourite parts: I really love the tiny little french knot umlauts, the perfect little yellow leaves and the tiny stitches in the felt bark. I also love how the concentric rings of backstitching look, leading to the little knot and heart in the center of the log. It was very soothing and hypnotic stitching these rings, turning the piece around and around in my hands as I went.
 To frame the finished family tree, I stretched the linen over a 10" square wooden canvas. I think it would look just as good framed in a 12" embroidery hoop. The only problem I had with this pattern is that people with very long names might find it difficult to fit them into the limited center space in the design. I think it would be relatively easy to work around this using a copier to enlarge either the whole design, or just increase the center heart design and eliminate one or two growth rings to make room for the larger center.
Liz is planning to have the pattern available in her shop in the next two weeks, but in the mean time she has lots of other cute stuff available, including all sorts of customizable family tree prints, heart pillows, and adorable welcome baby prints with fabric bunting. Check it out at http://www.cozyblue.etsy.com/
To frame the finished family tree, I stretched the linen over a 10" square wooden canvas. I think it would look just as good framed in a 12" embroidery hoop. The only problem I had with this pattern is that people with very long names might find it difficult to fit them into the limited center space in the design. I think it would be relatively easy to work around this using a copier to enlarge either the whole design, or just increase the center heart design and eliminate one or two growth rings to make room for the larger center.
Liz is planning to have the pattern available in her shop in the next two weeks, but in the mean time she has lots of other cute stuff available, including all sorts of customizable family tree prints, heart pillows, and adorable welcome baby prints with fabric bunting. Check it out at http://www.cozyblue.etsy.com/
I made shoes! I really wanted to tell you about these but I had to wait until after Christmas. This project was so satisfying. I have made a lot of different things in the past, but walking around in your own shoes (even if you can only wear them in the house) is so neat. And I made 6 pairs! One prototype for me and then all these beautiful ones for my best friends and family. Before this project I had no idea how small the difference was between shoe sizes. It works out to only a 1/4" difference, so if you try making multiples, I would recommend storing each size in a separate bag to keep them organized through each step. I accidentally sewed size 7 uppers to size 5 soles and size 5 uppers to size 7 soles and ruined 4 shoes with one mix-up! Actually, there are lots of things to be careful of here, as you have to not only pay attention to wrong/right sides, but also left/right sides. Learn from my fail!
I found the pattern for the kimono shoes at ithinksew. They have lots of other cute patterns including these boots! The directions include sizes 5-10, as well as photos and are easy to follow. For me, the tricky part of this project was fitting the uppers to the sole. If you have ever tried to sew a shirt, it is sort of like setting a shoulder. But with a little clipping and shifting it works out every time. I used a really soft sheepskin for the soles, which makes them nonskid and a little more durable. If you try making these shoes with leather soles, use small binder clips to hold the upper and sole together. Also, as you only sew one layer of thin leather, I don't recommend "leather/vinyl" needles. They don't work as well as a regular "sharps" size 12 needle, which makes smaller holes and sews smoother, with no skipped stitches.
I found the wonderful soft sheepskin leather for my shoes at Leather World, in Victoria, BC. I had never bought a whole hide before (I usually use re-purposed old leather garments). The staff at the store were really friendly and helped me choose the right type of leather. After much searching I settled on a particular hide. Its only flaw was was a small hole in one spot. I mentioned this to my helper, she laughed, and said "Well they all have a hole somewhere". I was looking at bullet holes.
After a lot of experimenting, I found that I liked the soft structure and feel of a single layer of cotton quilt batting to line the uppers, but double layers of a dense poly batting for the insoles, as it seemed to compress less after wearing them around.
The inside of these shoes is lined with a cushy aqua cotton chenille. The print (which I am in love with and even used when I made my blog banner) is from the Modern Meadow line by Joel Dewberry. I have some more in my stash and I may even try to make a quilt from it someday! You might notice that it looks like I used the meadow print the wrong way around on most of my shoes. I considered putting it the other way, but really, when you look down at your own feet, the print looks the right way up; and if you are like me and looking down at your own feet in cute shoes makes you happy, you want to see the print the right way up too. After all, they are really only there to please you.


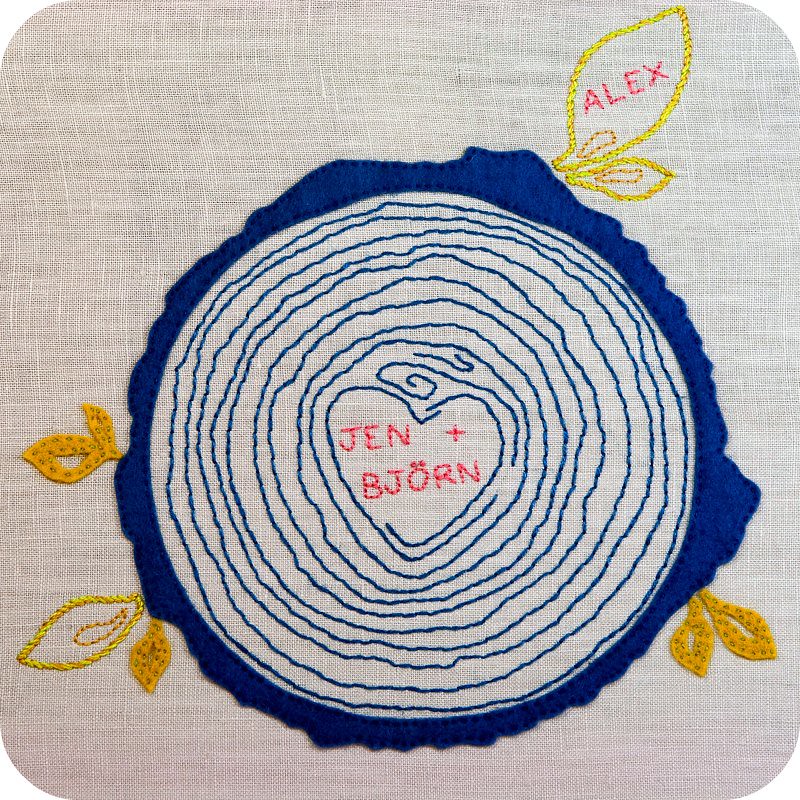 To frame the finished family tree, I stretched the linen over a 10" square wooden canvas. I think it would look just as good framed in a 12" embroidery hoop. The only problem I had with this pattern is that people with very long names might find it difficult to fit them into the limited center space in the design. I think it would be relatively easy to work around this using a copier to enlarge either the whole design, or just increase the center heart design and eliminate one or two growth rings to make room for the larger center.

