Showing posts with label tutorial. Show all posts

Sunday, March 27, 2011

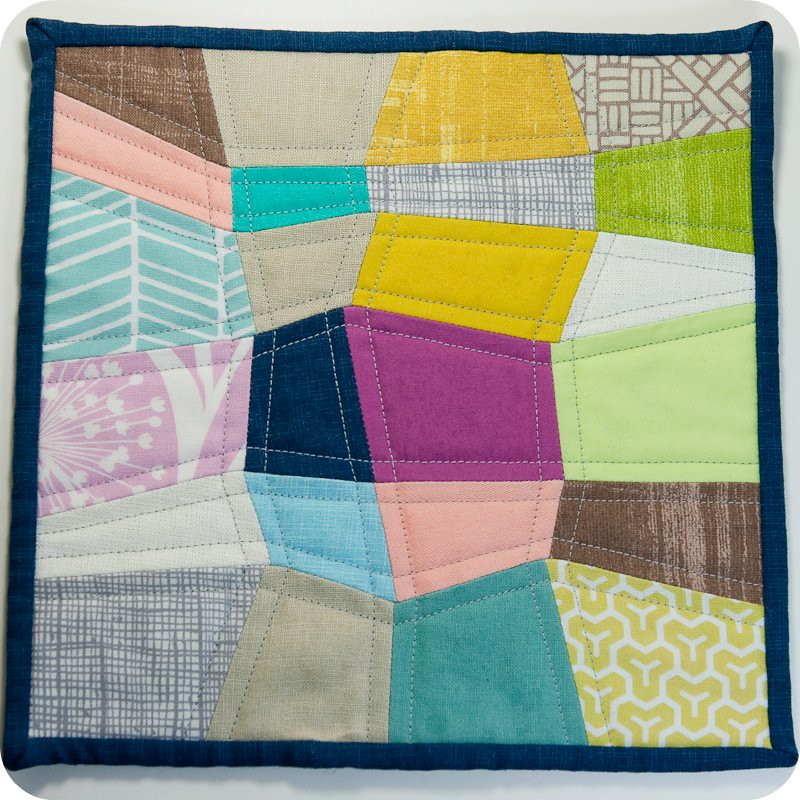
Mini Quadrilateral Quilt and Tutorial

Okay Mug Rug Madness, you got me. I had never before seen the point of making a tiny beautiful patchwork quilt and then hiding it (and/or risking its life) under a cup of tea. That is, not until I came up with a quilt project idea that I would need to test out on a smaller scale first. Now I get it: a quick and easy way to try out new and possibly daunting techniques, to try unexpected colour combinations or to just play around with your scraps. Yay Mug Rugs! Thanks to Erin over at Two More Seconds, I might be hooked.

The inspiration for my miniquilt (and the large scale quilt which as of yet lives only in my dreams) comes from this gorgeous modern print I found while perusing Etsy the other day.
Block Abstract Art Print by Melanie Mikecz of twoems 

Melanie's palette choice of bright saturated hues combined with neutrals, and the colour blocks in the design reminded me so much of everything I love about modern quilts. In fact, a lot of her prints look like they would make amazing modern quilt projects. They are so inspiring, you should really go take a peek. At first glance, I thought that I could achieve this look with improvisational piecing, but then I noticed that each quadrilateral colour block intersects at a single point and I would need to make a pattern. I also realized that sewing the rows of blocks together would require use of the dreaded Y-seam, which is why I tried a tiny version of this before committing to a huge quilt.
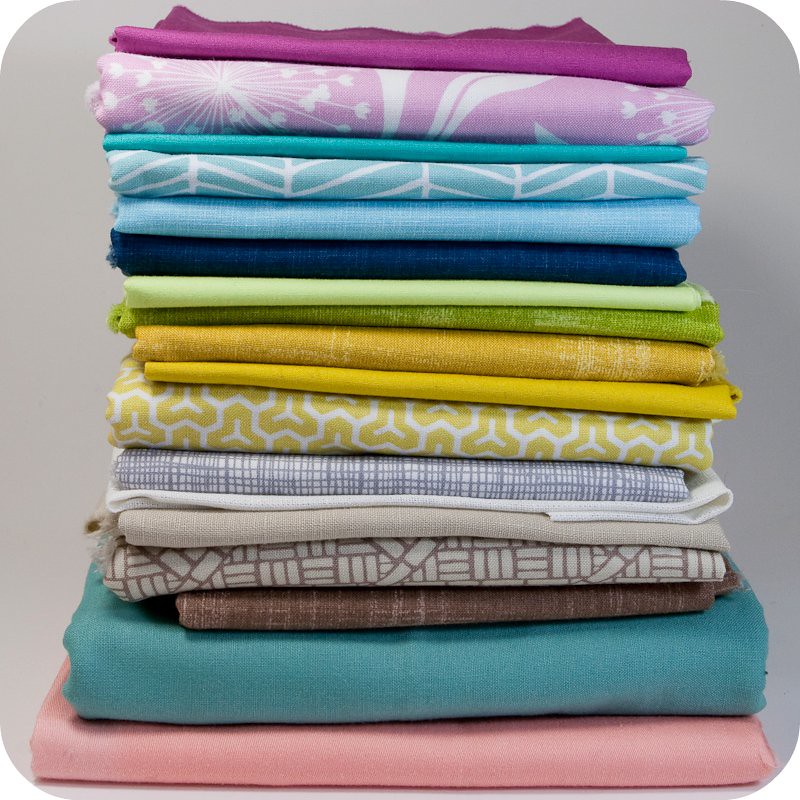
Choosing the fabrics for this project was a lot of fun. Are you a fan of the blog In Color Order? Well you should be. Jeni's series on The Art of Choosing has really helped me to develop an eye for how to use the fabrics in my stash. I decided that I wanted a palette of neutrals and cool colours, with a few hits of bright pink and yellow for contrast. I also chose to use only solids and colours+white to keep the focus on the geometric quality of the design.

The solids were a combination of natural and white linens, Laura Gunn's Magnolia Lane, Robert Kaufman's Quilters Linen and Pat Bravo's Pure Elements. The prints were from Alexander Henry, Joel Dewberry and Kate Spain. I also used a medium weight turquoise woven, and a lighter weight peach cotton sateen from my stash of fashion fabric.

For my pattern, I measured an 8" square onto the papery side of some freezer paper and added a 1/4" seam allowance around all 4 sides of the large square. Then I took a little ruler and started making 4 sided shapes with intersecting points to fill the square. You really can't go wrong here, but I tried to vary the width of the rows as well as the angles of each shape. Basically, the wonkier your quadrilateral shapes, the better. Number all the pieces, with your numbers facing the same way up so that you will be able to fit it all together again (underline your 6's and 9's!!). After I had carefully cut them all apart, I came up with the idea of drawing some horizontal lines on the pattern to indicate the direction of grain, so you might want to try that too. I just aligned the pattern pieces on the fabric grain as best as I could guess.

I wanted to ensure an element of randomness, so that the colour placement didn't get too fussy and predictable. To achieve this, after I cut out all the shapes, I put them in the randomizer (or "bowl" as some people call it) and then sat at my ironing board, with my stack of fabrics, choosing a piece at random from the bowl and ironing it to the wrong side of whatever fabric came next in the stack. When I had run out of fabrics in my original stack, I picked out all the neutrals and made a new stack, and repeated the process until I had ran out of pattern pieces. This is a variation on the theme of the Paper Bag method devised by the queen of improvisational quilting, Denyse Schmidt. Of course, as supreme ruler of your own quilting universe, you have the power to veto anything the randomizer chooses that you really dislike.
After ironing the pattern pieces to my fabric I trimmed each piece to include a 1/4" seam allowance around all sides (except where the edge seam allowance was already included) with my rotary cutter. Being really careful in this step makes everything easier to line up later. I left the paper patterns on for the whole sewing process to help make sure I was sewing accurately and then ripped them out gently at the end. How you choose to sew your Y-seams will affect how you proceed to the next step. There are a lot of schools of thought on this, and lots of online tutorials and videos to help you out; this was my first time trying to sew a Y-seam with my machine so if you know a better way, go with your gut.

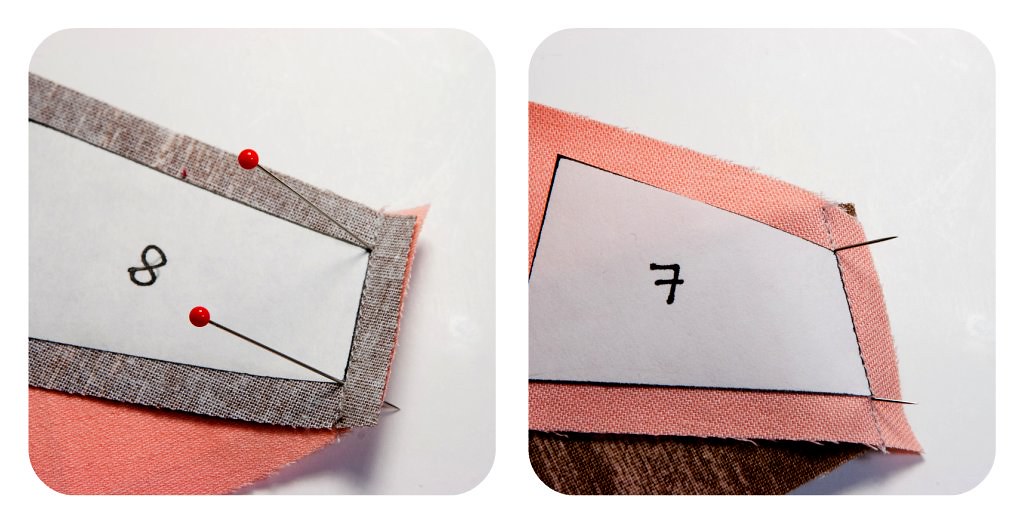
I chose to align each pair and chain piece them, sewing the seam through each seam allowance. I used my 1/4" foot to make piecing faster and more accurate. When aligning the pieces, I poked a pin through the fabric at each corner to be sure that they were lined up properly. It is trickier to get these right than you would assume due to all the funky angles so I checked each one individually to be sure. (I forgot to take a picture of this, so in the photo below, they are already sewn together). Press open the seams and then attach all the pairs to make complete rows. Press again, although not too enthusiastically, you don't want to steam them or distort them too much.I tried unsuccessfully to get a picture of how I sewed my Y-seams together. Please accept my apologies and watch this helpful video from videojug instead. Sew each matching side together, stopping at the center of each seam, then rotate the top row to line up the next pair of matching sides and sew again. Repeat this process of matching up seams and rotating the row until you reach the end. Again, it is helpful to poke a pin through the seam to check that it comes out at the same point on the other piece. I rotated the top row with the sewing machine needle down in the center seam, and I found that the fabric aligned smoothly.
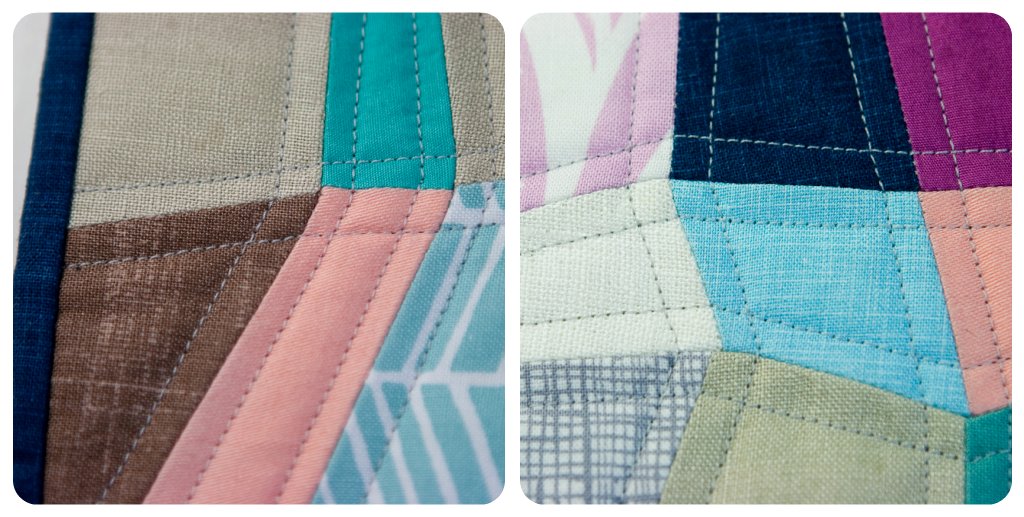
 Look how neatly some of my points line up! A few seams were off by a millimeter or so, but the finished block lies flat and with no waves or wrinkles so I was pretty happy with my first attempt at sewing Y-seams on my machine. I backed my mini-quilt with the beige linen, and used the dark blue quilters linen for the binding. I had a tough time deciding how to quilt this, but eventually went with a light grey thread and my walking foot to make parallel lines of stitching along all the seams. I think it accentuates the geometric pattern perfectly.
And now the obligatory pretty mug rug shot with my cute little cupcake mug from Momiji. I love my little mug, my mom got it for me for my birthday years ago and it always makes me smile when I use it.

So the goal now is to try to translate this project into a full size quilt (or maybe a lap quilt?). Making the full size pattern might be challenging, but I think it is still doable. I am not sure how I would quilt a larger version. I like my quilting pretty dense, so maybe alternating directions of close parallel lines in each block, or even an angular spiral within some of the blocks will accentuate the overall design.

Did any of you make mug rugs for Mug Rug Madness? I would love to hear about your inspiration. I hope some of you try making a cute little quadrilateral quilt like this, it was a great way to practice a tricky skill, and it makes a really modern and spectacular looking block.

Sunday, February 27, 2011

"Shoelace" Stitch - mini handsewing tutorial

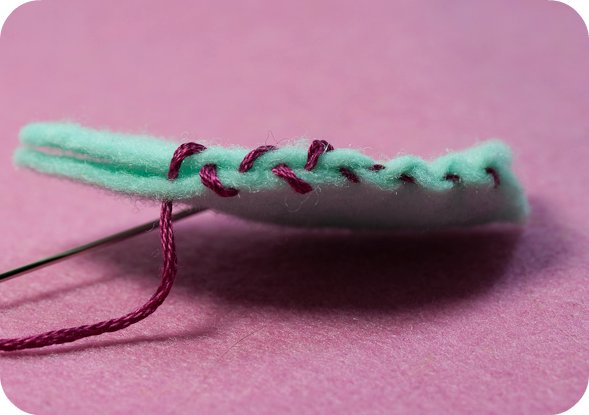
I decided I could do a better job explaining the handsewing technique that I was trying to tell you about in my last post so here is a little mini-tutorial in case you would like to try it. In my example above I have used a contrasting 6 stranded embroidery thread just so everything shows up nicely. You would want to use a closely matching, strong sewing thread in your real work.

As you can see above, the needle is inserted into the felt from the inside of the seam into one side and then from the inside of the seam to the other side, each time moving forwards a few millimeters and alternating directions. When you pull the thread tight the stitches bite into the felt and become almost invisible. I tend to sew about a half of an inch or so and then pull the thread tight, then sew another half inch, tightening my stitches as I go. Below you can see the untightened stitches on the left, and on the right are stitches which have been pulled tight.
Gently pulling the stitches will result in leaves that look slightly notched. Pull the thread tighter, and you get distinctly notched leaves that curve outwards. Pull very tight, more on one side of a leaf than the other, and you get leaves that twist and bend (pull the thread too tight, and it will snap and you will have to stomp your feet and start over). It is a great way to add simple three dimensional shape to a plant. Also, the thread seems to disappear into the felt, but without crushing the outer shape the way that blanket or overcast stitches seem to do when they are pulled tightly. To help shape the leaf the way you want, sometimes you can take the leaf and tug on the shape slightly to redistribute the gathers you have made.
 
 Above are three leaves that I have stitched using this technique. Each leaf started exactly the same shape and size. By tightening and gathering the stitches you are able to make progressively more curved leaves. If you find that you aren't able to tighten the stitches easily and want a more curved leaf, you might have to try spacing your stitches out a little more.

You could use leaves like this to build your own succulent felt plant, or you could pair a leaf with a felt flower to make a pretty pin or clip. If anybody knows the real name for this stitch I would love to find out. 

Tuesday, January 11, 2011

Felt Owl Measuring Tape + Free PDF Pattern

OK Internet, as promised, an owl craft made just for you! You can download a PDF pattern for this little Owl at the bottom of the page.

I have been stuck in bed this week, hit hard with the worst cold I think I have ever had. So if you want to try this at home, it is so easy it can be done under the covers, on a lap tray, while drinking tea and hunting for a good movie on Netflix. I just hope your partner doesn't mind little bits of felt and fluff in the bed!

I made this little owl out of some of my wool felt scraps and a tiny Japanese measuring tape which I had picked up ages ago at my favourite local fabric store, Gala Fabrics. Our little owl friend is hand sewn and embroidered with cotton embroidery threads, and stuffed, along with the measuring tape, with a little polyester fiberfill and some quilt batting. It is hard to see in the pictures, but the tape has a pull tab which comes out just behind the owls wing. If you don't have a tiny tape measure, you can still make a stuffy version or applique him onto any of your projects for some added cute.
The first step is to decide what colours you like for your owl and cut out all your felt pieces. This took my sick-addled brain a long time, but I finally I chose some of my favourite colours, a soft heather purple and pink with light browns. If you design your own felt animal for this project, notice in the photos below that you need to make the body at least a 1/4" bigger than your tape measure on all sides

Next, sew on the felt features and embroider the body of your owl. I used 3 strands of embroidery floss for most of the decorative stitches, 6 strands of brown for the owl body, and 2 strands to sew down the eyes and beak. I also used a little bit of stuffing in the beak to make it puffy. All my stitching is just simple straight stitches and overcast stitches. If you are not under the influence of a big mug of NeoCitran, you might want to attempt something fancier, but it's not really necessary (I had this idea to cover the back of the owl with lazy-daisy stitch "feathers", but that seemed too exhausting).

Decorate the front of each wing as you like and then sew the wing fronts and backs together with 2 strands thread, adding a little stuffing before closing them up. Stitch together the little toes. I used 1 strand of floss in a fine needle to make sewing the tiny little toes easier.
Cut out two pieces of cotton quilt batting a little smaller than your owl body. I used a little quilt baste spray (yeah, don't do that step in bed!) to attach the batting to the wrong side of each brown body piece. Position your measuring tape button side down, on the back side of your owl body, so that the tab comes out behind where a wing will be. I held the tape in place with a couple of basting stitches which I pulled out when the owl was finished.

I sewed the body together with overcast stitches, starting from the middle of the head and working my way around clockwise. Stuff as you go, both around the edges, and adding a little stuffing on top of the tape.

When you reach a spot to insert wings or feet, tuck them between the two body pieces and make sure your stitches catch all 3 layers as you sew. When you reach the tape measure tab, cut a little slit in the felt so that the tape can move freely (see picture above).

Keep sewing and stuffing until you reach the top of the head again, make a knot and then draw your thread through the owls body. Clip the thread close, the tail will be pulled back into the owls body. Pull out the basting stitches around the measuring tape from the back.
This little owl would be a great gift for a crafty friends sewing box, but a handy little measuring tape in your purse is really useful for thrifty shoppers too! I find carrying a measuring tape to garage sales and thrift stores helps me be sure that one of a kind finds will actually fit and be used in The Tiny Apartment and won't be a waste of money. I also carry a tiny notebook with the measurements of things I hope to find: the height of my chairs, the width of a shelf I could use, yardage for sewing projects, the diameter of the Pyrex lid I am missing, etc...
  
Download the PDF pattern here

Tuesday, January 4, 2011

Chunky Beaded Ring Tutorial

My Best Friend gave me the most beautiful handmade beaded ring for Christmas this year. She found it at Smoking Lily, which is one of my favourite places to find unique handmade gifts. Their headquarters are in Victoria BC, but they have a handful of stores scattered around Vancouver and a few other Canadian cities. If you are ever in the neighbourhood you should definitely check them out!

The ring was made by Dancing Leaf Designs and has a mix of vintage beads, pressed glass flowers and leaves, a band of tiny metallic seed beads and a backing of soft leather. This ring design is very comfortable to wear, and for those with metal sensitivities like me, the glass beads of the band won't irritate your skin. I have been wearing it every day and I love it so much that I have been trying to make some more beaded rings of my own. These two are what I have come up with so far:
I thought you might like to give it a try, so I have put together a little tutorial (of course, you can always just head over to Dancing Leaf's Etsy store and buy one instead!).

What you need:
  • A metal bead cap (see photos below) with many small holes, to serve as a base for the ring
  • Monofilament beading line
  • A few large feature beads, with some medium and smaller beads for filler (about 10-20)
  • A little pile of seed beads or very small beads for the ring band
  • A tiny scrap of leather (or you could probably use vinyl or felt)
  • E6000 or other very strong craft glue

 
1. Start by flattening the bead cap with a pair of flat pliers. I think you may be able to buy a special flat perforated metal disc made just for beaded rings like this and if you can find one, use it instead of a flattened bead cap.

2. Cut about a meter of monofilament line. Insert the two ends of the line into 2 small adjacent holes from the underside and begin beading the band from this spot.

3. Choose whatever beading pattern you like and continue until the band is long enough to fit just a little bit loosely around your finger (you want the band a little loose because the fit will be smaller after you add the leather under the ring base).
4. Insert the two ends of the line into two small holes opposite where you started the band (be sure there are no twists in the band). Tie the line using a reef knot on the underside of the metal base. Don't trim the excess monofilament lines.

5. Using one of the long ends, begin adding beads to your ring. Go up through the center hole, add your largest bead, followed by a small seed bead. The line then goes around the seed bead and through the large bead again. Feed the line down through the center hole and pull tight. Continue adding beads, working outwards, filling any gaps. The outermost ring of beads can include overhanging leaf shapes, loops of seed beads or your smaller beads stacked like short kebabs. It's a good idea to try it on occasionally to make sure the design looks balanced on your hand.
 6. When you are happy with your ring, pass the monofilament lines to the underside of the ring and tie together with another reef knot. Trim the ends short. Cut a small circle of leather to fit under the flattened bead cap. Coat the sueded side of the leather with E6000 glue and firmly attach to the inside of your ring. Let the glue set according to directions before wearing.

Tadaa! A sparkly and impressive looking ring you made yourself! Good for you!

    Monday, January 3, 2011

    Little Fabric Scrap Earrings


    Last year I had the opportunity to travel to Taiwan. The country is an amazing place to visit, with beautiful temples, fantastic natural landscapes and some of the nicest people I have ever met. In the shopping districts in Taipei, there are hundreds of cool little shops, many filled with trendy, zakka-style handmade jewellery, bags and clothing. In one of these, I saw some tiny little fabric earrings. They were so simple and cute, I still don't know why I didn't pounce on them immediately. The memory of these little earrings has been nagging at me ever since, and today I decided to go ahead and make some of my own.

    These earrings are a great way to use up little scraps of a favourite fabric you just can't throw away. They work best with tiny prints, or with a really eye-catching solid like an iridescent silk. Of course, if you have a tiny Japanese kawaii print, that would be great too! Along with the fabric, you need a tiny amount of fiberfill or wool roving, a pair of stud earrings, a needle and thread, and some strong craft glue such as E6000. It is best to use earrings that have a "cup" shaped end, instead of a flat surface (see first picture below).

    1. Flip over your fabric scrap and trace a small circle (I used a quarter as my template). Cut out 2 circles of your fabric. In Taipei, they were selling these as mismatched sets, so feel free to use 2 coordinating prints, or simply use different areas of the same fabric so they are not identical twins.

    2. Sew a running stitch around the circumference of your circle (you should use a matching thread, I used red to make the stitching clear in the photos).

    3. Roll up a pea-sized ball of your stuffing, place in the circle of fabric and pull the thread tight to gather into a ball. Make a few stitches across the gathers to hold the little ball tightly closed. Knot your thread and cut off.

    4. Put a tiny amount of E6000 glue on the earring, then carefully attach your fabric ball. Let glue harden overnight before wearing them.


    I was considering giving these away but I think I might have to keep them for myself! I really hope you try making yourself some of these. They take only a few minutes to make and are great little accessories.

    Tuesday, December 21, 2010

    Last Minute Craft: Hammered Chain Statement Necklace

    I made this necklace for myself after work this afternoon. I am planning on wearing it to my family Christmas party this year. But it would also be a great last minute gift for a friend who unexpectedly announces they will be visiting at Christmas, or to glam up your little black dress for a New Years Eve outfit. The nice thing about this design is that you can make it quite inexpensively, but it still turns out looking luxurious.

    The chain is only a cheap gold coloured base metal, but the hammered links sparkle just the same. You only need 2 larger beads and 12 small beads to finish it off. My favourite colour is purple, so I chose large Italian glass bubbles in a purple spiral, and my smaller beads were faceted dark metallic purple glass. This necklace would look fabulous in any combination of metals and colours. I find I have quite a few larger beads in my craft stash that I bought on impulse because of their colour or shape, but which I later found too heavy for earrings, or too showy to work well with others in a design. If you have anything like that at home, they are perfect for this necklace.

    What you need:
    • 12" small to medium chain (if you want a very long necklace, you could increase this)
    • 12" large hammered chain (or 6" lengths of different chains grouped together)
    • 2 large statement beads, something really fabulous from your stash if you have one
    • 1 lobster clasp, to match the metal you chose for your chain
    • about 8" of wire to match chain, you can use 20 or 22 gauge
    • 12 or more coordinating crystals or beads, about the width of the medium chain
    • Flat and Round Pliers, Wire Cutters
    I am assuming a basic knowledge of jewellery making in the following instructions. If you have never done anything like this before, it just takes a little practice. The only skills you need for this project are how to make a loop of wire, and how to make a wire wrap. I found this link to a very clear video showing the whole process of making wire wrapped loops.

    Instructions:
    1. Fold the large chain in half and put both ends in a wire loop. Wrap the wire 2 or 3 times.
    2. Add a statement bead sandwiched between 2 smaller beads on the wire and close with a wrapped loop. This loop will be one end of the necklace.
    3. Hold up the necklace to find the middle of the large chain, move over at least one link from the center so that the chain hangs nicely. Put this link in a wire loop, wrap wire like you did before.
    4. Add the second statement bead and two small beads onto this wire and make another loop.
    5. Pass one end of the small chain into this loop and close the loop with another wrap.
    6. Make a small wire loop, add the lobster clasp, wrap this loop.
    7. Add 3 small glass beads to the wire. Make another loop, inserting the other end of the smaller chain. Close this with a wire wrap.
    8. At this point, go and try on the necklace in a mirror. Decide if you want to make it shorter or longer. If you want it longer, make one or more cuts in the small chain and insert lengths of wire wrapped beads (groups of 1, 3 and 5 look nice). If you want to make it shorter, you can cut out a section of chain and add a shorter length of wire wrapped beads. I added beads to just one side of the necklace because I thought it needed a little asymmetry.
     All done! Now you are all ready for a night on the town.

    Friday, December 17, 2010

    The Golden Snitch! Ornament Tutorial


    Yup, I wore a hastily made clip-on felt Gryffindor tie to the premier of Harry Potter this year. This officially makes me a crafty dork, but it also means I had an uncontrollable urge to try making a Golden Snitch ornament for my tree. They turned out really nicely and I thought there might be one or two other crafty Potter fans out there who would like to know how to make one too.

    First, draw an actual size sketch of how you want your snitch wings to look on a scrap piece of paper. Use this as a guide to shape thin craft wire into your wing shape. Close the shape by twisting the wire around the other one 3 or 4 times to make a tight coil. Snip the wire close to the coil. Make 2 (I made 4 as I am giving another Snitch away to my lovely sister).

    Coat wires with glue and lay a sheet of tissue paper over top of wires. Use a clean dry brush to push down on the paper, sticking it down to the wires all around each wing. Let dry, then cut out, leaving a few millimeters of paper as a border. Apply glue to border and roll over edges of wire all around the wing. Coat wings on each side with white glue and apply light gold glitter. Let dry.


    I used a mixture of brown and gold acrylic paint to paint the swirly 'snitchy' markings on the golden ornaments. I did this mostly from memory and they don't look like movie replicas, but I am okay with that. It occurred to me that if you had a fine-point brown sharpie and one of those gold paint pens, you might be able to achieve real greatness here. I chose to use glass ornaments, because I had them already, although plastic might prove easier to attach the wings to.

    Use a small dab of hot glue on the wire coils to make a surface for attaching to the ball. I held each of them vertically against a piece of parchment paper. They don't stick to the parchment (or the glass balls, I tried this first), so just hold each one until the glue cools and a flat surface has formed on the bottom.

    I tried a bunch of glues to get the wings to stick to the glass balls. Hot glue pops right off, white glue takes too long to set, even Super Glue didn't work. Finally I tried my trusty Fabri-tac, a glue which I only recently discovered (that I cannot live without), which is like a very strong type of rubber cement, and success! Hold each wing until the glue sets (about a minute or so), then cover glue with gold paint. Tadaa! Go hang it on your tree and get yourself a cookie, you deserve it :)

    Wednesday, December 8, 2010

    Modern Christmas Village for a Tiny Apartment

    I have always loved the beautiful vintage cardboard houses in Christmas villages. Unfortunately, in The Tiny Apartment, there is no mantle piece, no empty bookshelf or spare side table on which to set up a village for the Christmas season. But this year, I have come up with a great solution so that even tiny apartments like mine can have a little snowy village complete with lights and mini trees. It takes up just 9 inches square of wall space, and who can't spare that?

    I made my village over 2 evenings, with a little time spent hunting down the supplies first. If you want to make your own village there are some special supplies you will need: a 9" square, deep shadow box frame, plaster of paris, small square dowels, mini trees, small sheet yellow vellum, glitter card stock, white fiberfill or other fake "snow", small rectangle of thin white acrylic batting and a short string of battery powered miniature LED's (much smaller than regular tree mini lights). You might be able to find the lights where Christmas village sets are sold. I found mine for 5$ at Michaels. Basic craft supplies you probably already have include some old cereal boxes, assorted glitters, hot glue gun, white glue, old paint brushes, craft knife and scissors, heavy background paper, craft wire and wire cutters and any other decorations you want. 
    First make your little houses. If you are lucky enough to own some real vintage houses, you can skip ahead and use this project as a great way to display them! I cut my houses out of thin cardboard from cereal boxes. I also made a fence to go in front of the houses out of a double layer of cardboard, cut to fit the interior width of my frame. Remember to glue vellum down inside windows and door opening before gluing houses together with glue gun. Cut a hole in the back of each house just big enough to accommodate a single light. If you need help designing your houses, Twelve22 has a great free printable house pattern here to get you started. Remember that everything gets coated in glitter and plaster so if you make any mistakes they will not be visible later.

    Coat sides of houses with white glue and then glitter. Mix up plaster of paris according to directions on box, it should be smooth and about as runny as pancake batter. Use an old paint brush to apply to roof, window and door frames, the top of the chimney and the fence. I added another layer of plaster to the houses once they started to set. Sprinkle a little extra silver glitter on the roof after plastering. I also dipped some really cheap green fake trees in the plaster, and then dusted with white glitter to make snowy trees, which turned out great! I found them in a dollar bin at a model railway store, much cheaper than the trees sold with other Christmas decorations. Set everything aside to dry overnight.

    Measure and mark a line 3/8" inside the back edge on all sides and glue doweling behind this line with hot glue (cut to fit about 3/4 of the length of each side). Use short sections of dowel to secure battery box (glue dowels down around box, don't glue box down) against the back dowel with "on-off" switch towards the front. Cut vignette out of glitter cardstock to fit inside the frame; make a notch for the battery box and another small notch on the opposite side for the light cord. Make little wire "hooks" and glue to back of doweling to secure lights around frame. Leave an LED for each house and then pull string to back of scene and attach by bending hooks around wire (see process shots). Glue glitter cardstock to dowels. Make a snowy ground with white batting. Position houses and poke remaining lights into each. Glue down front fence. Insert trees and then fill in any gaps with a little fiberfill; use fiberfill to cover on-off switch on battery box too. Cut background paper to fit and glue to back of frame. Hang and enjoy! Whew!

    OK, so this project has a lot of steps, but it isn't very difficult and with a little patience the beautiful results make it worthwhile. If anyone tries this out please let me know, I would love to see your photos! To see more photos of this project you can check out my Flickr.

    Friday, December 3, 2010

    Needle Felted Terrarium and Mushroom Tutorial

    A while back, I saw a post on Craft about everlasting terrariums which I really loved. I wanted to do a similar project, but make my own mushrooms with needle felting. This project was extremely fun to do and also looked amazing when it was finished. There are so many ways to customize your terrarium; you could make different mushrooms, add real forest objects like dry leaves, rocks or tiny pine cones, or you could even add kitschy items like vintage ceramic animals or little gnomes.

    I had never needle felted anything before, but the low cost for one barbed needle and a couple ounces of wool roving made me confident to just give it a try. I also lucked out and found the perfect glass "terrarium" at a second hand shop for 2$. Needle felting is pretty easy; you just loosely form shapes with your wool, rest them on a piece of thick foam (to protect yourself) and stab at it with the needle until it becomes firm and takes shape. I didn't have any instructions for my mushrooms, and sort of came up with a process as I went along.

    To form a mushroom, felt a flattish pancake of wool, adding as you go to the top so that it forms a smooth dome, or whatever profile you want your cap to be. Turn it over and punch an inner circle to make an indent. The wool pulls together and firms up as you needle it, so that is how the indent forms. Roll a log of your stem-coloured wool and fold the bottom end over itself; this will make the stem end a little bulbous when you felt it. Leave the very top of your stem unfelted. Tease this out into a flat circle and center inside your cap. Stab the needle all around the stem into the cap, pushing the "gills" inside the indent. If you are making a polka-dot mushroom, roll tiny balls of wool and attach them to the cap by gently stabbing them with the needle. Be very careful not to stab yourself at that point, the needle is very sharp! I found that when I was finished, there were little stray fluffy hairs that needed to be snipped off with scissors in order to make the surface smooth.

    If you follow the Craft tutorial for how to make your terrarium base, I should mention that I pushed wires into my mushroom stems (use a gentle jackhammer motion, twisting didn't work as well) and then just poked them into the moss base instead of using glue. Because nothing is glued down I can rearrange them as much as I like and if I ever want to make any changes I can.

    If you live in Victoria, BC and are interested in learning more about needle felting, or if you are looking for a great place to get supplies, I recommend heading over to Knotty By Nature Fibre Arts, on Government St. in Victoria, BC. They were really helpful when I walked in with this project idea and I like supporting local businesses.

    I also made some tiny fabric ferns for my terrarium. You can see a photo and short description of how they were made here. I have to be honest and tell you that the ferns were a huge pain in the ass to make. It was an incredibly fiddly job getting all of the leaves to stay on and align properly. If I was to make this again, I would cut the leaves out as attached pairs instead of individually in order to make it easier.