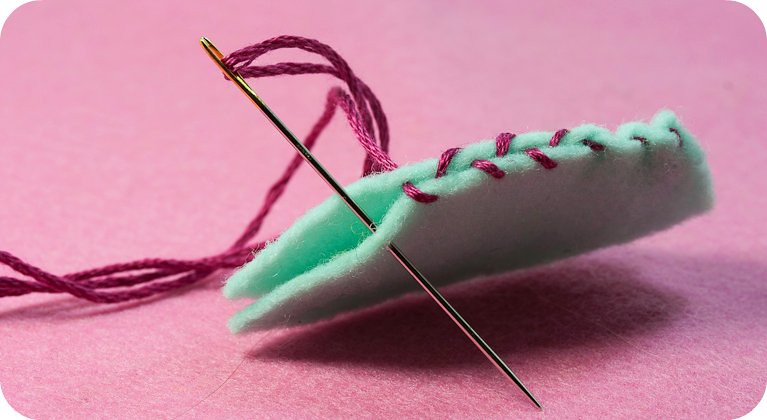
I decided I could do a better job explaining the handsewing technique that I was trying to tell you about in my last post so here is a little mini-tutorial in case you would like to try it. In my example above I have used a contrasting 6 stranded embroidery thread just so everything shows up nicely. You would want to use a closely matching, strong sewing thread in your real work.
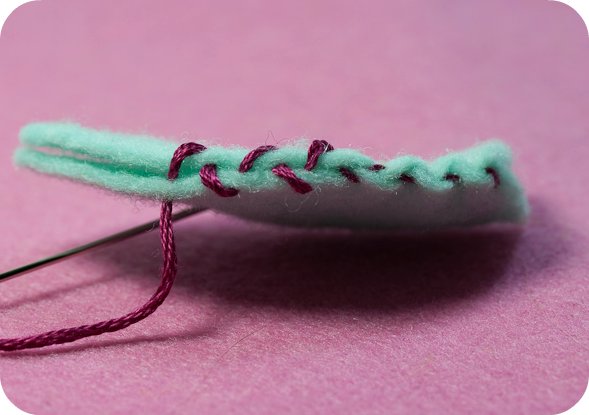
As you can see above, the needle is inserted into the felt from the inside of the seam into one side and then from the inside of the seam to the other side, each time moving forwards a few millimeters and alternating directions. When you pull the thread tight the stitches bite into the felt and become almost invisible. I tend to sew about a half of an inch or so and then pull the thread tight, then sew another half inch, tightening my stitches as I go. Below you can see the untightened stitches on the left, and on the right are stitches which have been pulled tight.
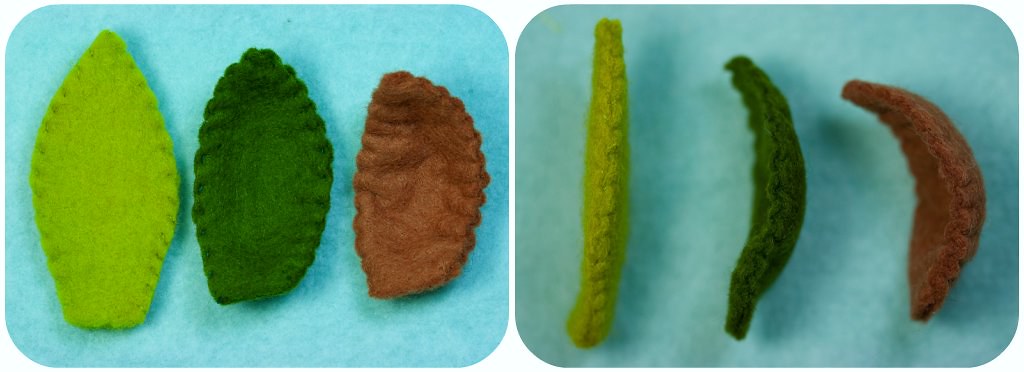
Gently pulling the stitches will result in leaves that look slightly notched. Pull the thread tighter, and you get distinctly notched leaves that curve outwards. Pull very tight, more on one side of a leaf than the other, and you get leaves that twist and bend (pull the thread too tight, and it will snap and you will have to stomp your feet and start over). It is a great way to add simple three dimensional shape to a plant. Also, the thread seems to disappear into the felt, but without crushing the outer shape the way that blanket or overcast stitches seem to do when they are pulled tightly. To help shape the leaf the way you want, sometimes you can take the leaf and tug on the shape slightly to redistribute the gathers you have made.

Above are three leaves that I have stitched using this technique. Each leaf started exactly the same shape and size. By tightening and gathering the stitches you are able to make progressively more curved leaves. If you find that you aren't able to tighten the stitches easily and want a more curved leaf, you might have to try spacing your stitches out a little more.
You could use leaves like this to build your own succulent felt plant, or you could pair a leaf with a felt flower to make a pretty pin or clip. If anybody knows the real name for this stitch I would love to find out.


Hi Gabrielle, I'm Adline from Malaysia. I came across your blog on Craft Magazine :) I just adore your felt succulents and all your other crafts. I see you've just started blogging, I hope you'll keep on going, because I love your work! :)
ReplyDeleteAwesome tutorial!
ReplyDeleteI made some of your tape measure stuffies- a bunny and a kitten! You can see pictures of them on my blog!
ReplyDeleteVery good post! We will be linking to this great
ReplyDeleteHi there just wanted to give you a quick heads up.
ReplyDeleteit’s awesome article. I look forward to the continuation
yurtdışı kargo
ReplyDeleteresimli magnet
instagram takipçi satın al
yurtdışı kargo
sms onay
dijital kartvizit
dijital kartvizit
https://nobetci-eczane.org/
JBB
Seems genuine but rather regardless of whether it's actual it doesn't prevent everybody from fostering their own thoughts of excellence.
ReplyDeleteI truly enjoy looking at on this web site, it contains fantastic articles
ReplyDeleteI like the helpful info you provide in your articles. Good luck for the next.
ReplyDeleteThanks for sharing your thoᥙghts. I trulу apρreciate youг efforts
ReplyDeleteI enjoy your site. Thanks for writing this way, goodjob
ReplyDeleteGreat performance on this website. I enjoyed browsing it
ReplyDeleteExcellent quality writing, it is uncommon to see a nice blog
ReplyDeleteHello there! This post could not be written any better!
ReplyDeleteThis is so much hilarious blog, Anyways thanks for posting ideas.
ReplyDelete
ReplyDeleteThanks to sharing with us !!!!!!
Nice read, I just passed this onto a colleague who was doing a little research on that... MM
ReplyDeleteIt’s very impressive. Thanks for the inspiration! I really appreciate people like you!... MM
ReplyDeleteCertainly, great work! It was really engaging and wonderfully written. Thanks... MM
ReplyDeleteThis is an extremely well written article. Thanks for the post. I'll definitely return... MM
ReplyDeleteThanks in support of sharing such a fastidious opinion, piece of writing is pleasant... MM
ReplyDeleteInteresting post to read on! I'd love to see more posts like this in the future... MM
ReplyDelete