Sunday, February 27, 2011

"Shoelace" Stitch - mini handsewing tutorial

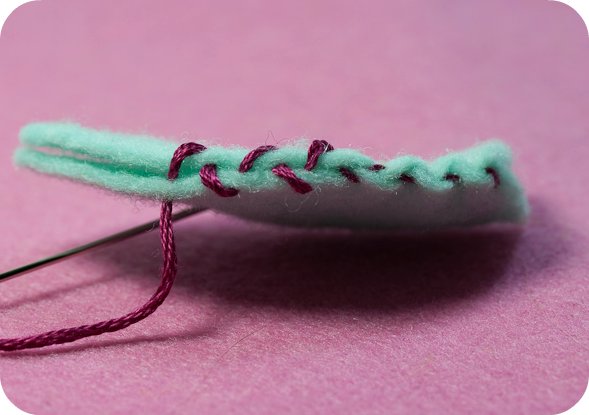
I decided I could do a better job explaining the handsewing technique that I was trying to tell you about in my last post so here is a little mini-tutorial in case you would like to try it. In my example above I have used a contrasting 6 stranded embroidery thread just so everything shows up nicely. You would want to use a closely matching, strong sewing thread in your real work.

As you can see above, the needle is inserted into the felt from the inside of the seam into one side and then from the inside of the seam to the other side, each time moving forwards a few millimeters and alternating directions. When you pull the thread tight the stitches bite into the felt and become almost invisible. I tend to sew about a half of an inch or so and then pull the thread tight, then sew another half inch, tightening my stitches as I go. Below you can see the untightened stitches on the left, and on the right are stitches which have been pulled tight.
Gently pulling the stitches will result in leaves that look slightly notched. Pull the thread tighter, and you get distinctly notched leaves that curve outwards. Pull very tight, more on one side of a leaf than the other, and you get leaves that twist and bend (pull the thread too tight, and it will snap and you will have to stomp your feet and start over). It is a great way to add simple three dimensional shape to a plant. Also, the thread seems to disappear into the felt, but without crushing the outer shape the way that blanket or overcast stitches seem to do when they are pulled tightly. To help shape the leaf the way you want, sometimes you can take the leaf and tug on the shape slightly to redistribute the gathers you have made.
 
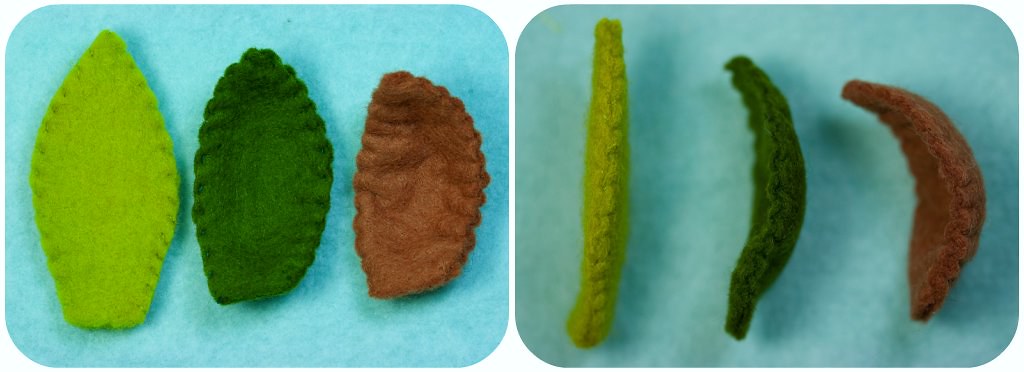
 Above are three leaves that I have stitched using this technique. Each leaf started exactly the same shape and size. By tightening and gathering the stitches you are able to make progressively more curved leaves. If you find that you aren't able to tighten the stitches easily and want a more curved leaf, you might have to try spacing your stitches out a little more.

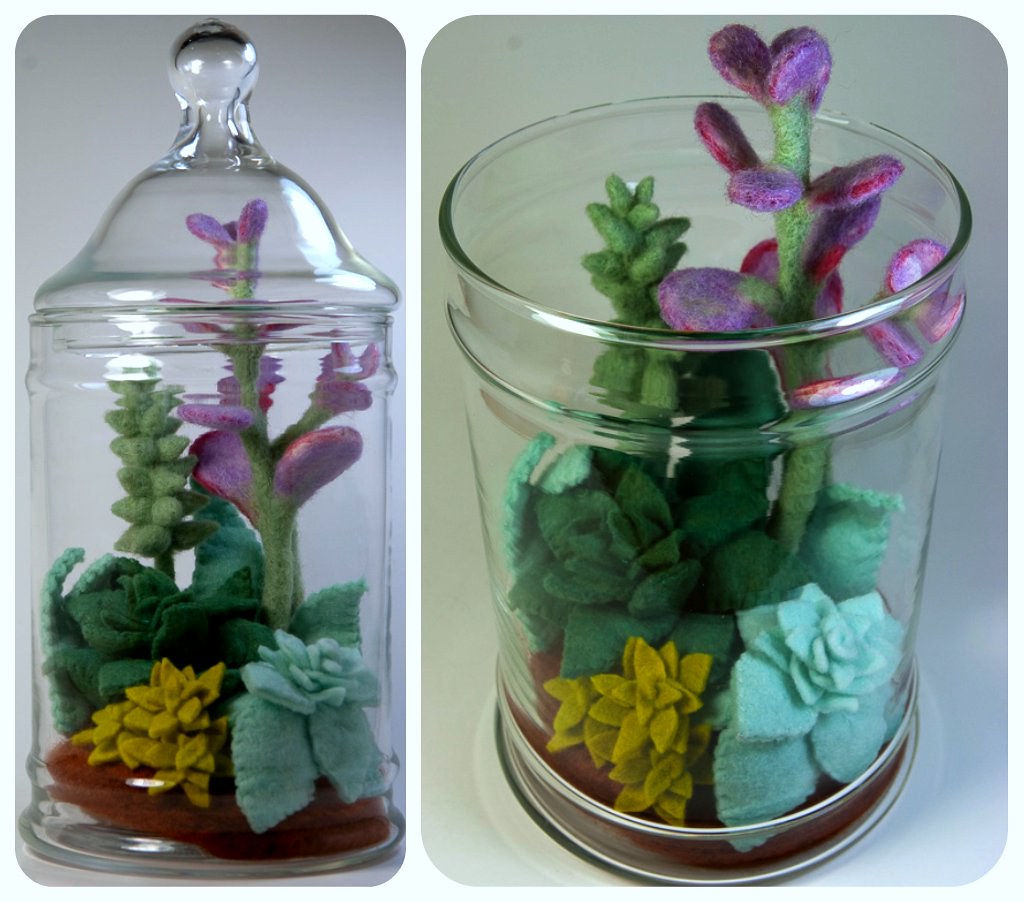
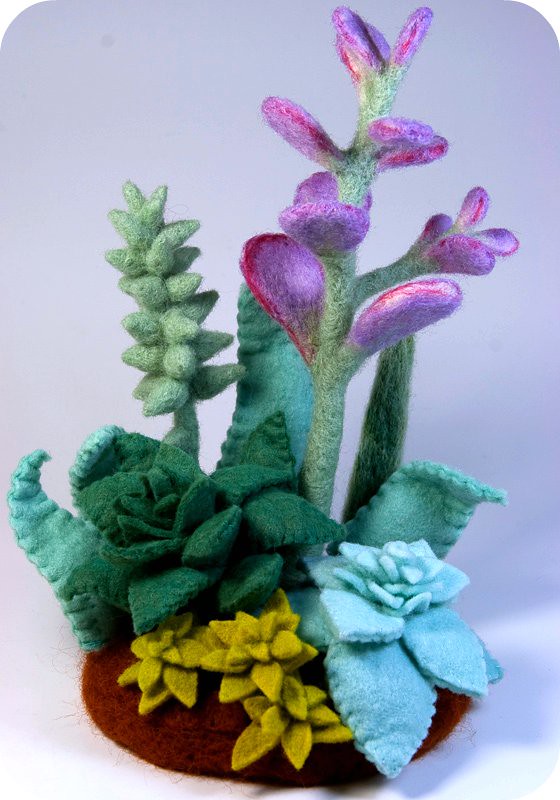
You could use leaves like this to build your own succulent felt plant, or you could pair a leaf with a felt flower to make a pretty pin or clip. If anybody knows the real name for this stitch I would love to find out. 

Friday, February 25, 2011

Needle Felted Succulent Terrarium

Ever since I made my first felt terrarium I have searching my local thrift stores for the perfect glass containers so I can make some more. This week scroungers luck was with me and I now have 4 glass terrariums waiting to be turned into special little microcosms! It is snowing outside and I am thinking of summer, so I decided to make my terrarium out of felted versions of sun-loving succulents. I love the colours and shapes and I wish I had a patio where I could expand my collection - have you seen Geninne's? I am so jealous.

Succulents really lend themselves to being made from felt because their leaves have a natural "plush" look to them and the wool seems to take on their soft palette of greens and blues easily.

Because the beautiful colours of these plants was such a big part of my inspiration, I have to admit to being really fussy about colour with this project. I hand-dyed the sheets of wool felt, starting with either cream or white, to get different grades of blue-greens. To achieve the yellow-green of the tiny filler plants in the front of the terrarium I over-dyed very light blue-green felt with natural turmeric (handy tutorial from Lion Brand for dying wool with turmeric). For the jade plant, I layered wisps of wool roving in white, light green, bright magenta and soft lavender, in order to get the leaves just right.

I knew I would have to make some tall succulent plants in order to make my terrarium look full. I decided that I would start with a jade plant, as I had a real plant in my living room to study. After searching the internet, I think I may actually be the first person crazy enough to needle-felt a jade plant. Trust me to make an everlasting version of a plant that already is drought resistant and impossible to kill! It is made with a pipe cleaner armature. I needle-felted a smooth stalk and smaller side branch around the pipe cleaner in light green wool. The leaves were attached to the stalk, alternating directions with each pair. Oh, did I mention, I also stabbed myself about a hundred times? I need to figure out a better way to felt the edges of thin leaves that doesn't involve sandwiching my barbed needle between my fingers.
The "Hens and Chicks" type succulents were made almost the way you would make a rose. I started with a small cone of needle felted wool, and then built the plant around this, starting with the smallest leaves and adding larger and larger leaves. The outermost layers are not only double felt, but stuffed with wool roving. I also made a second tall succulent with many cone-shaped leaves, some tiny filler plants, as well as some large curling leaves that I used for the background. Everything was arranged and sewn down to a terracotta-coloured needle felted base.

I also discovered a new (probably only new to me) stitch for sewing together two layers of felt; I am going to call it "Shoelace" stitch, because that is how I sew it.
**Update: I have moved the description for the Shoelace stitch to its own mini-tutorial here.

Sunday, February 13, 2011

Valentines Day Craftbook Challenge Fail

Check out this cute little frog! A dear reader, Raquel, made him following my instructions for the felt owl measuring tape and was kind enough to send me a photo of him. He is so great, good job Raquel. (I really love getting this kind of mail, if anyone out there completes any of my projects, please please please send me a photo!)

I want to thank you all again for entering the giveaway, your kind comments were overwhelming as always. Congratulations to the the winners! Gem of GemmaJoy, from Brisbane Australia, and Kristin of Kleas, from Minneapolis MN, your keychain clutches and earrings are in the mail. You both have lovely blogs and I am so happy that the randomizer picked you :)
So I had this fabulous idea to make myself some cute zakka-style oven mitts for Valentines Day. I don't even have plain-old regular oven mitts and I burn myself every time I try to take something out of the oven so I was pretty excited about this project. I gathered up my materials: some pretty vintage cotton rickrack and Japanese crochet lace trim, some linen-esque fabric with a cute red stripe pattern, pretty red and white dot lining and some space age silvery batting. And to make my project over the top, cross stitched little fawns from the wonderful book, A Rainbow of Stitches, by Agnes Delage-Calvet, Anne Sohier-Fournel, Muriel Brunet, and Francoise Ritz. 

How can this go wrong I ask you? OK, on to the FAIL part of my Valentines Day Craft Book Challenge project...
Do you see what I see? Maybe we need to do a little closeup: 

Is it just me, or does that little fawn look, sort of, well, Grinchy? I think it isn't just me. These little fawns are evil twins. I can't have them on my oven mitts. They look like they might burn me with their disapproving stares. Really, I don't know how I didn't notice this until I had appliqued the little red hearts and rick rack around each of them.

I think maybe it is just one of those problems that eyes are so dang expressive, and my little half-stitch is somehow making the deer all squinty and mean, and if you tried this, your half-stitch would make the deer look sad, or happy, or confused etc...

The project picture of these little fawns in the book look decidedly sweet, which is why I chose them in the first place:
So what am I going to do with these little hearts? Should I make them into snarky anti-valentines? Give them to someone nearsighted? Carefully unpick all the stitches and burn them so they can't come alive at night and do the bidding of an evil overlord? (perhaps I have watched too much science fiction)

Happy Valentines Day everyone! Tell a friend how much you care about them.

Saturday, February 5, 2011

Surprise! Another Giveaway!


The Giveaway is now closed, thank you so much for visiting, and thanks to all of you who participated. I will be announcing the winners soon.

 Every time I see how many people have visited this blog I am amazed. It is wonderful to be able to share ideas around the world and to be part of this online community of talented, crafty and artistic people. So to show my appreciation for all the wonderful feedback I have been getting, I am hosting a little surprise giveaway! 

I am giving away 2 keychain clutches, and inside each clutch I am adding a pair of pretty silver earrings, all handmade by me. I will be randomly choosing 2 names from the comments and contacting the lucky winners by email. The giveaway will close Wednesday, February 9th. Anybody can enter, I am willing to mail these anywhere in the world. Please check the bottom of this post for entry instructions.
These cute little keychain clutches were made using a Keyka Lou pattern. I really enjoyed sewing with this pattern, which uses little darts to give the clutches a nice shape. I used a different Kokka linen canvas for each one: a patchwork Echino by Etsuko Furuya (above) and Ruby Star Rising by Melody Miller (below). They are both lined with a turquoise tiny heart quilters cotton and accented with vintage buttons I found at my local thrift store. I chose to interface the clutches with felt to add extra structure and to make them a little padded. The closure is a Velcro strip under the flap. The clutches are very small, approximately 2.5" by 4", but are useful for holding a few precious items such as a few cards and some small cosmetics like a lipbalm.

The silver drop earrings are made from some really cool crystals and dark purple pearls which I brought home from my trip to Taiwan. I bought them from the craft and jewellery district just north of the Taipei Main Station, which is crammed full of stores selling crystals and kits for making tiny beaded animals, purses, desserts and dolls. I actually bought one of these kits, which was a minor disaster I will have to tell you about some other time.

I haven't been able to find faceted metallic rondelle crystals like these anywhere at home and they are very special and unique. The beads dangle from a delicate silver chain and have lovely movement when wearing. They hang approximately 1" long from sterling silver earwires. Everything I used for making these earrings is new, and they have never been worn.

The design is modern with just a little edginess and they are perfect for a lunch out with friends or a night on the town. I guarantee you will get some compliments... you can tell them they were handmade for you by a friend!

Never want to miss a spontaneous surprise giveaway? Subscribe! Thank you all so much for visiting. Good Luck!

The Giveaway is now closed, thank you so much for visiting, and thanks to all of you who participated. I will be announcing the winners soon.