Showing posts with label felted. Show all posts

Friday, February 25, 2011

Needle Felted Succulent Terrarium

Ever since I made my first felt terrarium I have searching my local thrift stores for the perfect glass containers so I can make some more. This week scroungers luck was with me and I now have 4 glass terrariums waiting to be turned into special little microcosms! It is snowing outside and I am thinking of summer, so I decided to make my terrarium out of felted versions of sun-loving succulents. I love the colours and shapes and I wish I had a patio where I could expand my collection - have you seen Geninne's? I am so jealous.

Succulents really lend themselves to being made from felt because their leaves have a natural "plush" look to them and the wool seems to take on their soft palette of greens and blues easily.

Because the beautiful colours of these plants was such a big part of my inspiration, I have to admit to being really fussy about colour with this project. I hand-dyed the sheets of wool felt, starting with either cream or white, to get different grades of blue-greens. To achieve the yellow-green of the tiny filler plants in the front of the terrarium I over-dyed very light blue-green felt with natural turmeric (handy tutorial from Lion Brand for dying wool with turmeric). For the jade plant, I layered wisps of wool roving in white, light green, bright magenta and soft lavender, in order to get the leaves just right.

I knew I would have to make some tall succulent plants in order to make my terrarium look full. I decided that I would start with a jade plant, as I had a real plant in my living room to study. After searching the internet, I think I may actually be the first person crazy enough to needle-felt a jade plant. Trust me to make an everlasting version of a plant that already is drought resistant and impossible to kill! It is made with a pipe cleaner armature. I needle-felted a smooth stalk and smaller side branch around the pipe cleaner in light green wool. The leaves were attached to the stalk, alternating directions with each pair. Oh, did I mention, I also stabbed myself about a hundred times? I need to figure out a better way to felt the edges of thin leaves that doesn't involve sandwiching my barbed needle between my fingers.
The "Hens and Chicks" type succulents were made almost the way you would make a rose. I started with a small cone of needle felted wool, and then built the plant around this, starting with the smallest leaves and adding larger and larger leaves. The outermost layers are not only double felt, but stuffed with wool roving. I also made a second tall succulent with many cone-shaped leaves, some tiny filler plants, as well as some large curling leaves that I used for the background. Everything was arranged and sewn down to a terracotta-coloured needle felted base.

I also discovered a new (probably only new to me) stitch for sewing together two layers of felt; I am going to call it "Shoelace" stitch, because that is how I sew it.
**Update: I have moved the description for the Shoelace stitch to its own mini-tutorial here.

Wednesday, January 26, 2011

Year of the Rabbit Sewing Kit

 
Have you heard 2011 is the Year of the Rabbit? That sounds good to me; rabbits have always been associated with luck, so I hope this will be a lucky year. Rabbits are also symbols of the coming spring, and I am pretty sick of blah winter rains and no sunshine.

I wanted to make a little "extra present" for my sister, who just had a birthday, but has been studying hard and deserves a little extra something just for being herself. As she and I both have a fondness for cute little woodland animals, I decided to make her gift rabbit-themed, to go with the new year, and lucky, sunny wishes. I made her a cute little sewing kit, including a needle book, a white rabbit measuring tape, and a little needle felted rabbit teacup pincushion. 
 
The tail of the white rabbit measuring tape is a ball of needle felted cream wool, which also serves as the pull tab for the measuring tape. I used a tiny shell button in the center of the rabbit to trigger the mechanism for retracting the tape. I decided to keep the design simple and not include any details in the rabbit except for a green eye. The rabbit body was made in much the same way as my owl tape measure.
The needle book is 6" square, with one center page. I fused Timtex between the layers of fabric and felt to make the books cover very rigid (more "book-like" than most fabric books). On the inside, I used little panels of felt to separate each type of needle. There are also some pockets for holding sewing machine needles, a needle threader, and a pair of Japanese thread snips. I found a little piece of vintage velvet ribbon use as the tie. For the heavy needles, I sewed down two rows of a Japanese crochet cotton lace I purchased from Daiso in Vancouver; the larger needles can thread easily through the holes in the lace.

Here is the inside of the needle book: 
The pin cushion was the most fun of the three little projects to make. I really love needle felting. It feels like magic crafting. Before I tried it, I didn't know what all the fuss was about, but now it is my favourite thing to do late at night. My rabbit is made of grey and white felt wool, his eyes are black seed beads and his nose is a few stitches with pink embroidery thread.  I really like the expression on the little grey bunny. He looks like he was disturbed from his lunch of felt buttercups by a nosey crafter, and he is just waiting for me to look away so he can go about his business.

There are a lot of other teacup pincushions out there. The first time I saw the beautiful little worlds in a teacup made by Mimi Kirchner, I knew I wanted to try to make one. My teacup is like a very simple version of the beautiful scenes she creates.

Happy Chinese New Year!

Monday, January 17, 2011

Green Felt Bird

 
I really love birds. I think this came from my Mom, who took me on a lot of nature walks as a kid, made beautiful feeders and birdhouses for our yard and always took the time to point out the different species we saw and how she identified each one. She is also a very talented artist and carver, and filled our home with gorgeous, and sometimes quirky, wooden birds.

Lately, I have found a lot of other crafty and artistic people who find inspiration in the beautiful shapes and colours of birds. One such person is Geninne, from Geninne's Art Blog, who paints the most stunning and vivid watercolours. Her work is very modern, filled with colour, and every time I visit her blog I feel inspired to get out my paints and practice. If you haven't already stumbled on her, I highly recommend taking a look.

Another blogger whose love of birds inspires me is Abigail Patner Glassenberg, from While She Naps. Abigail is the author of The Artful Bird, a book filled with projects for sewing amazing birds from all sorts of different materials. My little green bird was created using a pattern from this book for a wren. It is made of hand-sewn wool felt, with needle felted and embroidered details, and legs made from craft wire. I really love how it stands on its own two feet! The colours I chose, the bright chartreuse and emerald green, were inspired by the fearless use of colour in Geninne's paintings.
This little bird is for you Mom!

Wednesday, December 29, 2010

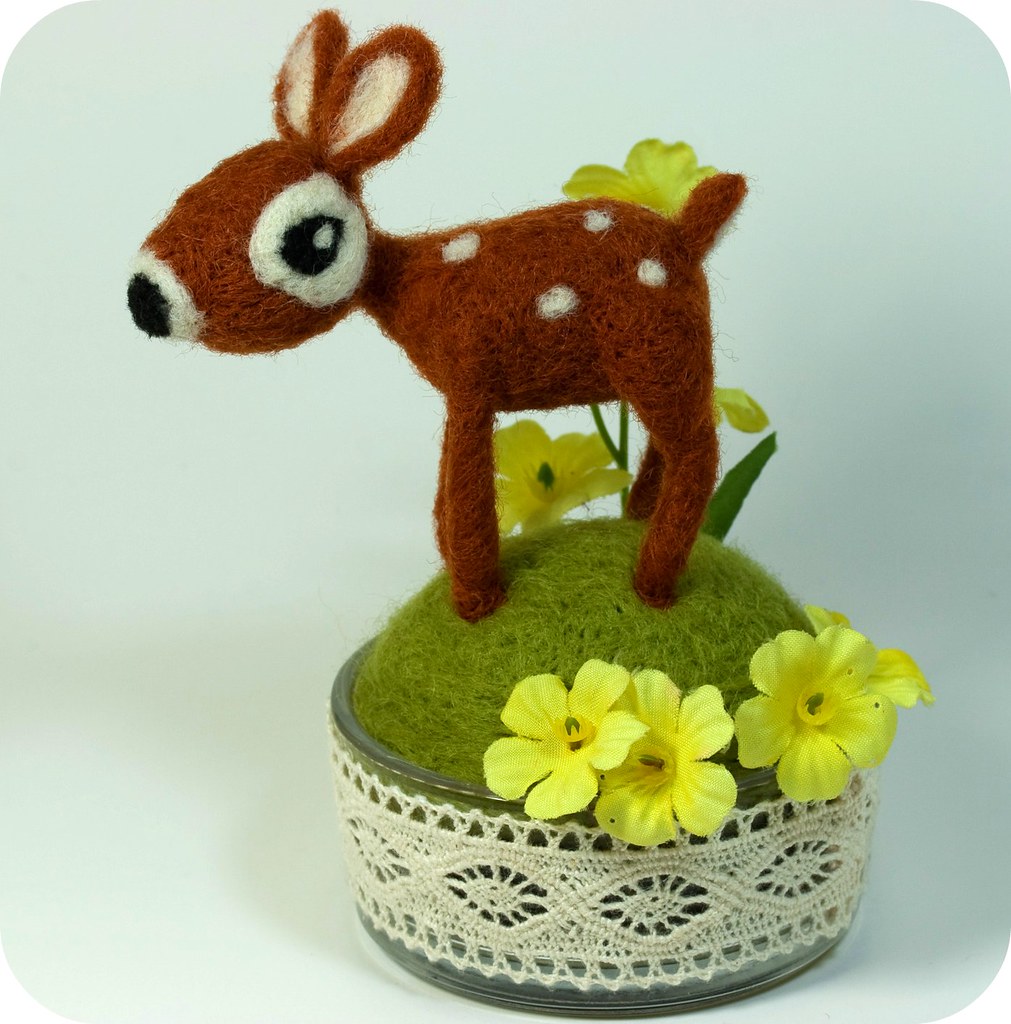
So Cute! Tiny Needle Felted Fawn


Just a quick post to show you this little needle felted fawn. I think she is the cutest thing I have made all year! I was inspired by this little deer made by LuckyNielsen.

I figured out how to make my little deer by breaking down the body into a series of simple shapes. You know those "How to Draw" books we all had as kids that start with simple ovals and cylinders, and with a few extra lines to smooth between them, you have suddenly drawn a dog or a horse or something? I used the same idea, but imagined the shapes in 3D. When you connect the shapes together, using your needle, you smooth the transitions, and with a little extra poking, refine the shapes to look more like the animal you want to achieve. I think you could make anything you can imagine using this principle.

I used pipe cleaners inside the legs for added stability, but I didn't make a wire armature for the whole body, as I have seen other people do. I did it this way because I wanted to felt each leg individually (which is easier) and then attach them one at a time to the body.

This little fawn is only 3" tall. For the base, I made a grassy knoll out of felt that fits inside a large glass tea light holder from Ikea. Then I added a little Japanese cotton lace and some vintage flowers to up the cuteness factor to 100. I considered adding a little bow around her neck, but I thought that might make me pass out from a cute-overload so I held back.

PS: When you start making a super cute little fawn like this, you are just stabbing at blobs of brown felt. But when you add the eyes and the ears and it really starts taking shape, it is like you are repeatedly stabbing Bambi. Which can be a little disturbing. Forewarned is Forearmed.