
I made my village over 2 evenings, with a little time spent hunting down the supplies first. If you want to make your own village there are some special supplies you will need: a 9" square, deep shadow box frame, plaster of paris, small square dowels, mini trees, small sheet yellow vellum, glitter card stock, white fiberfill or other fake "snow", small rectangle of thin white acrylic batting and a short string of battery powered miniature LED's (much smaller than regular tree mini lights). You might be able to find the lights where Christmas village sets are sold. I found mine for 5$ at Michaels. Basic craft supplies you probably already have include some old cereal boxes, assorted glitters, hot glue gun, white glue, old paint brushes, craft knife and scissors, heavy background paper, craft wire and wire cutters and any other decorations you want.

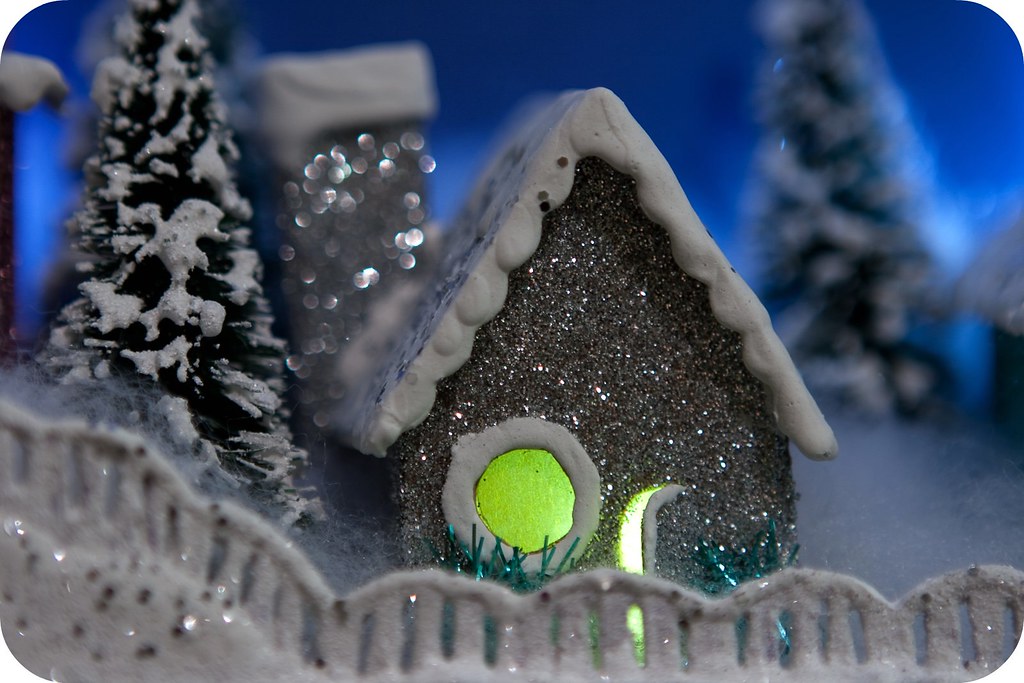
First make your little houses. If you are lucky enough to own some real vintage houses, you can skip ahead and use this project as a great way to display them! I cut my houses out of thin cardboard from cereal boxes. I also made a fence to go in front of the houses out of a double layer of cardboard, cut to fit the interior width of my frame. Remember to glue vellum down inside windows and door opening before gluing houses together with glue gun. Cut a hole in the back of each house just big enough to accommodate a single light. If you need help designing your houses, Twelve22 has a great free printable house pattern here to get you started. Remember that everything gets coated in glitter and plaster so if you make any mistakes they will not be visible later.
Coat sides of houses with white glue and then glitter. Mix up plaster of paris according to directions on box, it should be smooth and about as runny as pancake batter. Use an old paint brush to apply to roof, window and door frames, the top of the chimney and the fence. I added another layer of plaster to the houses once they started to set. Sprinkle a little extra silver glitter on the roof after plastering. I also dipped some really cheap green fake trees in the plaster, and then dusted with white glitter to make snowy trees, which turned out great! I found them in a dollar bin at a model railway store, much cheaper than the trees sold with other Christmas decorations. Set everything aside to dry overnight.

OK, so this project has a lot of steps, but it isn't very difficult and with a little patience the beautiful results make it worthwhile. If anyone tries this out please let me know, I would love to see your photos! To see more photos of this project you can check out my Flickr.
hot stuff!! very pretty.
ReplyDeleteI love it!!!! you've inspired me. Thanks
ReplyDeleteSooo neat!
ReplyDeleteI've re-looked at this everyday for the past 3 days. It's so wonderfully cozy and sweet!
ReplyDeleteGrazie per la favolosa idea, avevo già creato il fondo marino in una scatola, ma pensa un po' non avevo mai pensato a questo.!!!
ReplyDeleteUseful information, great. Thank you so much for this excellent blog article.
ReplyDeleteThis blog posts are more interesting and impressive. This post was good.
ReplyDeleteAbsolutely a wonderful stories you made here. Cheers for this blog.
ReplyDeleteThank youu
ReplyDeleteOpravdu skvělý článek, Rád jsem si přečetl článek. Je to pro nás velmi poučné. Díky za zveřejnění.
ReplyDelete